Using Redux with Handsontable data grid
 Recipes / November 10, 2023

If you’re familiar with centralized state management systems in React, you probably recognize their benefits. In the context of data grids, where various data points can be interconnected, these systems are invaluable. For instance, a change in a date field could seamlessly propagate updates to associated fields like ‘Age’. Similarly, when the quantity of an item is set to zero, it could automatically trigger a change to its status, marking it as ‘Out of stock.’
Adopting a modular approach might lead to challenges during updates, especially if data resides in a separate file from the local component state. This is where centralized state management becomes useful, allowing data to be dispatched or retrieved from any component.
In this article, we will delve into the process of integrating Redux with Handsontable data grid, providing you with a comprehensive guide to effectively manage state within this context.
Why use Redux with a Handsontable data grid?
There are several benefits to using Redux with Handsontable data grid:
Centralized State Management: Redux simplifies the passing of data to the grid from different components, enhancing data sharing and consistency.
Predictable State Changes: Thanks to Redux’s immutable state and enforced unidirectional data flow, understanding and predicting state changes becomes simpler. This is particularly useful when multiple components interact with the same dataset, ensuring consistency throughout.
Middleware Support: Redux offers middleware options such as Redux Saga or Redux Thunk, enabling smooth handling of asynchronous operations. This capability is particularly valuable when a data grid requires interaction with backend APIs.
Scalability: Through its modular approach, Redux contributes to a maintainable codebase that can easily scale. This is especially important for accommodating the growth of your application over time.
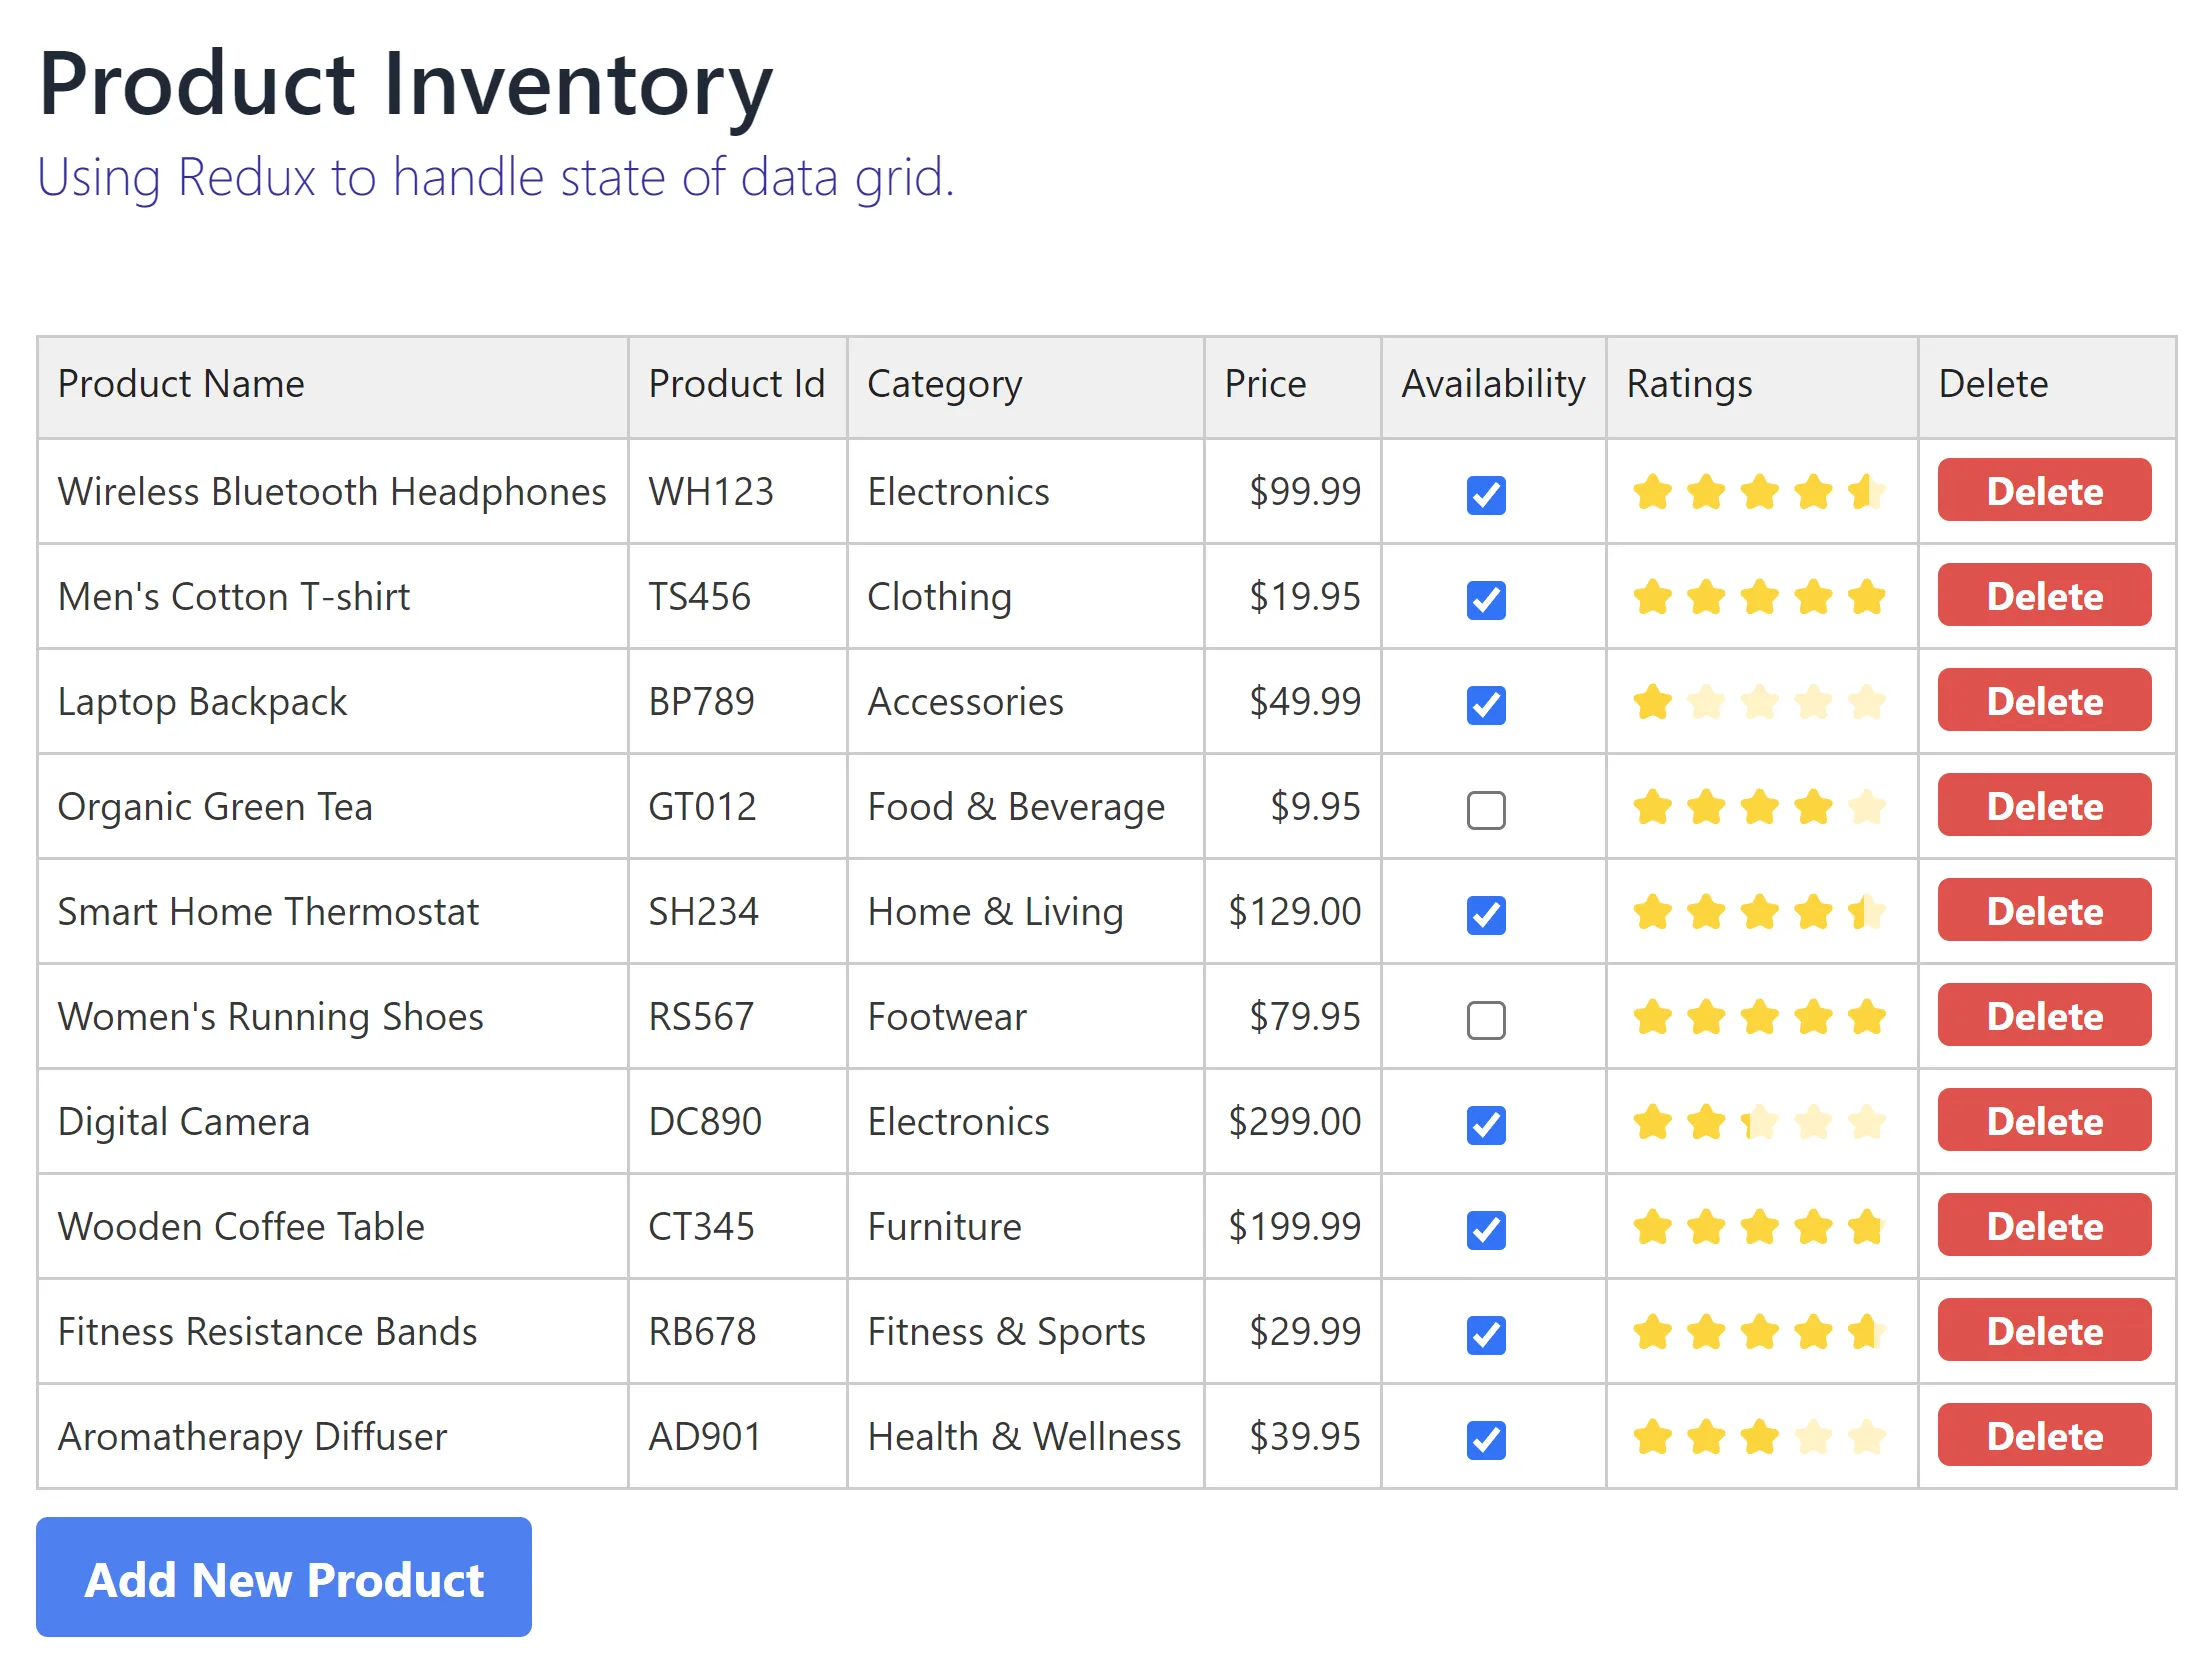
Live Demo
Prerequisites & required libraries
To set up our project, we’ll require the following libraries:
"dependencies": {
    "react": "18.2.0",
    "react-dom": "18.2.0",
    "@handsontable/react": "13.0.0",
    "handsontable": "13.0.0",
    "@reduxjs/toolkit": "1.8.1",
    "react-redux": "8.0.1"
}
For styling, we’ve opted for TailwindCSS and DaisyUI. Feel free to choose any other supportive framework that suits your preferences.
"devDependencies": {
  "autoprefixer": "10.4.2",
  "daisyui": "3.5.0",
  "postcss": "8.4.7",
  "tailwindcss": "3.3.3"
}
Step-by-step implementation of Redux with data grids
Step 1: Create a React project — To begin, create a React project using a utility like Create React App or Vite.
Step 2: Install libraries — Next, install the required libraries listed in the prerequisites section.
Step 3: Set up Redux — Setting up Redux involves two main components: the Store and Reducers. A Reducer holds the state and functions to manipulate that state, while the Store registers these Reducers. All Redux-related code will be placed in the ./src/redux directory.
Firstly, we’ll create the Reducer because the Store will require it. Given that our project involves a product inventory, the Reducers’ responsibility will include adding, removing, and updating products. Initially, we’ll establish the structure, and the actual implementation will follow. Let’s name this file productSlice.js:
./src/redux/slice/productSlice.js
import { createSlice } from '@reduxjs/toolkit';

export const productSlice = createSlice({
  name: 'products',
  initialState: {},
  reducers: {},
});

export default productSlice.reducer;
Time to create the Store:
./src/redux/store.js
import productReducer from './slice/productSlice';

const store = configureStore({
  reducer: {
    products: productReducer,
  },
});

export default store;
Here, we’re configuring the Store using the configureStore() function and incorporating our productReducer into it. Subsequently, we’ll need to envelop our application with this Store to ensure that the centralized state is accessible throughout the entire application. Open the index.js or main.js file to proceed:
./src/main.jsx
import ReactDOM from 'react-dom/client';
import { Provider } from 'react-redux';
import store from './redux/store';
import App from './App.jsx';
import './index.css';

ReactDOM.createRoot(document.getElementById('root')).render(
  <React.StrictMode>
    <Provider store={store}>
      <App />
    </Provider>
  </React.StrictMode>
);
Step 4: Constant file — A constants file serves as a repository for strings and interfaces. Within our project, certain entities can be defined as constants. These entities encompass elements such as page headings, descriptions, delete button titles, adding new product button titles, and a list of table columns.
./src/businesslogic/constants.js
export const DELETE_COLUMN_TITLE = 'Delete';

export const DELETE_BUTTON_TITLE = 'Delete';

export const ADD_NEW_PRODUCT_BUTTON_TITLE = 'Add New Product';

export const TABLE_COLUMNS = {
  productName: 'Product Name',
  productID: 'Product Id',
  category: 'Category',
  price: 'Price',
  availability: 'Availability',
  ratings: 'Ratings',
};
Step 5: Generating product data objects — To maintain a single source of truth for table columns, We’ve devised a function named fillProducts() within the productSlice.js file. This function serves the purpose of generating product data objects. Here’s the updated code:
./src/redux/slice/productSlice.js
import { createSlice } from '@reduxjs/toolkit';
import { TABLE_COLUMNS } from '../../businesslogic/constants';

export const fillProducts = (
  product = {
    productName: '',
    productID: '',
    category: '',
    price: 0,
    availability: false,
    ratings: 1,
  }
) => {
  const productProperties = {};
  Object.keys(TABLE_COLUMNS).forEach(
    (column) => (productProperties[column] = product[column] ?? '')
  );
  return productProperties;
};

export const productSlice = createSlice({
  name: 'products',
  initialState: {},
  reducers: {},
});

export default productSlice.reducer;
Step 6: Fill some table data — We keep the table data in a separate file.
./src/businesslogic/TableData.js
import { fillProducts } from '../redux/slice/productSlice';

export default class TableData {
  static getTableData() {
    return [
      fillProducts({
        productName: 'Wireless Bluetooth Headphones',
        productID: 'WH123',
        category: 'Electronics',
        price: 99.99,
        availability: true,
        ratings: 4.5,
      }),
      fillProducts({
        productName: "Men's Cotton T-shirt",
        productID: 'TS456',
        category: 'Clothing',
        price: 19.95,
        availability: true,
        ratings: 4.8,
      }),
      fillProducts({
        productName: 'Laptop Backpack',
        productID: 'BP789',
        category: 'Accessories',
        price: 49.99,
        availability: true,
        ratings: 1,
      }),
      fillProducts({
        productName: 'Organic Green Tea',
        productID: 'GT012',
        category: 'Food & Beverage',
        price: 9.95,
        availability: false,
        ratings: 4,
      }),
      fillProducts({
        productName: 'Smart Home Thermostat',
        productID: 'SH234',
        category: 'Home & Living',
        price: 129.0,
        availability: true,
        ratings: 4.4,
      }),
      fillProducts({
        productName: "Women's Running Shoes",
        productID: 'RS567',
        category: 'Footwear',
        price: 79.95,
        availability: false,
        ratings: 5,
      }),
      fillProducts({
        productName: 'Digital Camera',
        productID: 'DC890',
        category: 'Electronics',
        price: 299.0,
        availability: true,
        ratings: 2.3,
      }),
      fillProducts({
        productName: 'Wooden Coffee Table',
        productID: 'CT345',
        category: 'Furniture',
        price: 199.99,
        availability: true,
        ratings: 4.7,
      }),
      fillProducts({
        productName: 'Fitness Resistance Bands',
        productID: 'RB678',
        category: 'Fitness & Sports',
        price: 29.99,
        availability: true,
        ratings: 4.6,
      }),
      fillProducts({
        productName: 'Aromatherapy Diffuser',
        productID: 'AD901',
        category: 'Health & Wellness',
        price: 39.95,
        availability: true,
        ratings: 3,
      }),
    ];
  }
}
Step 7: Initializing state with initial data and creating Reducer functions — Up until this point, our Reducer hasn’t been performing any actions. To remedy this, we’ll begin by setting the initial data within the state. Following that, we’ll proceed to write functions responsible for tasks like creating table records, deleting them, and performing updates.
./src/redux/slice/productSlice.js
import { createSlice } from '@reduxjs/toolkit';
import TableData from '../../businesslogic/TableData';
import { TABLE_COLUMNS } from '../../businesslogic/constants';

export const fillProducts = (
  product = {
    productName: '',
    productID: '',
    category: '',
    price: 0,
    availability: false,
    ratings: 1,
  }
) => {
  const productProperties = {};
  Object.keys(TABLE_COLUMNS).forEach(
    (column) => (productProperties[column] = product[column] ?? '')
  );
  return productProperties;
};

export const productSlice = createSlice({
  name: 'products',
  initialState: {
    value: TableData.getTableData(),
  },
  reducers: {
    addNewProduct: (state, action) => {
      state.value = [...state.value, { ...fillProducts() }];
    },
    removeProduct: (state, action) => {
      const { productIndex } = action.payload;
      state.value = [
        ...state.value.filter((product, index) => index !== productIndex),
      ];
    },
    updateProduct: (state, action) => {
      const { productIndex, updatedProperties } = action.payload;
      state.value[productIndex] = {
        ...fillProducts({
          ...state.value[productIndex],
          ...updatedProperties,
        }),
      };
    },
  },
});

// Action creators are generated for each case reducer function
export const { addNewProduct, removeProduct, updateProduct } =
  productSlice.actions;

export default productSlice.reducer;
In the provided code, we interact with the state to carry out various operations, and subsequently, we export these functions as actions. These functions, known as actions, can be invoked from any component. Dispatching these actions makes it possible to manipulate the state according to the specific requirements.
Step 8: Implementing Handsontable data grid — With the Redux setup now in place, we’re ready to proceed with implementing the data table using Handsontable. This marks the final step in the process.
./src/App.jsx
import React, { useEffect, useState } from 'react';
import { HotTable } from '@handsontable/react';
import 'handsontable/dist/handsontable.full.min.css';
import { registerAllModules } from 'handsontable/registry';
import './App.css';
import {
  ADD_NEW_PRODUCT_BUTTON_TITLE,
  DELETE_BUTTON_TITLE,
  DELETE_COLUMN_TITLE,
  PAGE_DESCRIPTION,
  PAGE_HEADING,
  TABLE_COLUMNS,
} from './businesslogic/constants';
import { useDispatch, useSelector } from 'react-redux';
import {
  addNewProduct,
  removeProduct,
  updateProduct,
} from './redux/slice/productSlice';

// register Handsontable's modules
registerAllModules();

function App() {
  const hotRef = React.useRef(null);
  const tableData = useSelector((state) => state.products.value);
  const dispatch = useDispatch();

  useEffect(() => {
    setTimeout(() => {
      hotRef.current.hotInstance.render();
    }, 100);
  }, []);

  const deleteButton = (td, row) => {
    const button = document.createElement('button');
    button.innerText = DELETE_BUTTON_TITLE;
    button.classList =
      'bg-red-500 hover:bg-red-700 text-white font-bold py-0 px-4 rounded';
    button.onclick = () => dispatch(removeProduct({ productIndex: row }));

    td.innerHTML = ''; // Clear the cell content
    td.appendChild(button); // Append the button to the cell
    return td;
  };

  const columns = [
    {
      data: 'productName',
      title: TABLE_COLUMNS.productName,
    },
    {
      data: 'productID',
      title: TABLE_COLUMNS.productID,
    },
    {
      data: 'category',
      title: TABLE_COLUMNS.category,
    },
    {
      data: 'price',
      title: TABLE_COLUMNS.price,
      type: 'numeric',
      numericFormat: {
        pattern: '$0,0.00',
      },
    },
    {
      data: 'availability',
      title: TABLE_COLUMNS.availability,
      type: 'checkbox',
      className: 'align-center',
    },
    {
      data: 'ratings',
      title: TABLE_COLUMNS.ratings,
      renderer: (instance, td, row, col, prop, value, cellProperties) => {
        if (value >= 0 && value <= 5) {
          td.style.lineHeight = '0px';
          td.innerHTML = `
            <div class="ratingWrapper">
              <span class="activeRating" style="width: ${
                20 * value
              }%;">⭐⭐⭐⭐⭐</span>
              <span class="inactiveRating">⭐⭐⭐⭐⭐</span>
            </div>
          `;
        }
      },
    },
    {
      title: DELETE_COLUMN_TITLE,
      renderer: (instance, td, row, col, prop, value, cellProperties) => {
        return deleteButton(td, row);
      },
      readOnly: true,
    },
  ];

  const settings = {
    data: tableData,
    columns,
    autoWrapRow: true,
    beforeChange: (changes, source) => {
      if (changes) {
        let verified = true;
        switch (TABLE_COLUMNS[changes[0][1]]) {
          case TABLE_COLUMNS.price:
            if (isNaN(Number(changes[0][3]))) verified = false;
            break;
          case TABLE_COLUMNS.ratings:
            if (!(changes[0][3] >= 0 && changes[0][3] <= 5)) verified = false;
            break;
        }

        if (verified) {
          dispatch(
            updateProduct({
              productIndex: changes[0][0],
              updatedProperties: { [changes[0][1]]: changes[0][3] },
            })
          );
        }
      }

      return false;
    },
  };

  return (
    <div className={'container p-6'}>
      <h2 className={'text-3xl font-semibold'}>{PAGE_HEADING}</h2>
      <p className={'text-lg font-light text-indigo-800'}>{PAGE_DESCRIPTION}</p>

      <div className={'mt-10'}>
        <HotTable
          ref={hotRef}
          settings={settings}
          licenseKey="non-commercial-and-evaluation"
        />
      </div>

      <button
        className="bg-blue-500 hover:bg-blue-700 text-white font-bold py-2 px-4 rounded my-2"
        onClick={(e) => dispatch(addNewProduct())}
      >
        {ADD_NEW_PRODUCT_BUTTON_TITLE}
      </button>
    </div>
  );
}

export default App;
./src/App.css
.handsontable td {
  padding: 6px;
}

.handsontable thead th {
  text-align: left;
  padding: 2px;
}

.align-center {
  text-align: center;
}

.ratingWrapper {
  position: relative;
  height: inherit;
  width: 90px;
}

.activeRating {
  position: absolute;
  top: 0;
  z-index: 2;
  overflow: hidden;
  left: 0;
  display: block;
  line-height: 21px;
}

.inactiveRating {
  position: absolute;
  top: 0;
  opacity: 0.3;
  left: 0;
  display: block;
  width: 100%;
  line-height: 21px;
}
Conclusion
We’ve now completed the integration of Redux with the Handsontable data grid for React. You’ve learned about the benefits of using a centralized state management system in your app. Next, you can explore fetching data asynchronously and using middleware like Redux Saga or Thunk to handle the process effectively.
You might also be interested in our article demonstrating how to format date with date-fns and day.js in a data grid. Check it out!
Paulina Kajzer-Cebula
Content Marketing Manager