Hands-on: Format date with date-fns and day.js in a data grid
 Hands-on / August 25, 2023
The concept of dates is truly intriguing. Their representation varies across different software, giving rise to the necessity of formatting. Nations across the globe adopt various date formats like the MM/DD/YYYY in the US or DD/MM/YYYY in other regions. Neglecting proper date formatting can result in confusion regarding the order of the day and month, leading to potential misinterpretations of the date’s meaning.
What will you learn in this guide?
In this guide, you will learn how to utilize the day.js and date-fns libraries to format a date string within a Handsontable data grid by employing cell renderers.
For instance, we will take the date 1965-04-04 and transform it into a more comprehensible and unequivocal format: 4th April 1965. Moreover, we will extract additional insights from it, such as the age (58), Day of Birth (Sunday), and Month of Birth (April).
Project Demo
Let’s create our project
Setup
It’s time to set up the React environment for our handsontable-format-date project. Ensure you have Node version 14 or higher and npm version 5.2+ installed on your system.
Once you’re all set, open your trusty terminal, and let’s get started:
npx create-react-app handsontable-format-date
cd handsontable-format-date
npm install date-fns dayjs handsontable @handsontable/react
While composing this guide, we’re using the following versions:
"dependencies": {
    "@handsontable/react": "13.0.0",
    "date-fns": "2.30.0",
    "dayjs": "1.11.9",
    "handsontable": "13.0.0",
    "react": "18.2.0",
    "react-dom": "18.2.0"
  }
Implementing Handsontable data grid
To create a Handsontable data grid with custom fields for formatting date strings, we will need the following:
✅ Data – The data displayed in the data table must be in the JavaScript array of objects format. In our project, we’ll use the following data for the main cast of Avengers:
const tableData = [
    { name: 'Robert Downey Jr.', dob: '1965-04-04' },
    { name: 'Chris Evans', dob: '1981-06-13' },
    { name: 'Mark Ruffalo', dob: '1967-11-22' },
    { name: 'Chris Hemsworth', dob: '1983-08-11' },
    { name: 'Scarlett Johansson', dob: '1984-11-22' },
    { name: 'Jeremy Renner', dob: '1971-01-07' },
    { name: 'Tom Hiddleston', dob: '1981-02-09' },
  ];
You can see that we put the name and dob of the cast.
✅ Columns – A table comprises columns, and each column has a heading. For Handsontable, we can declare columns like this:
const columns = [
    { data: 'name', title: 'Name' },
    {
      data: 'dob',
      title: 'Date of Birth',
      renderer: (instance, td, row, col, prop, value) => {
        td.innerHTML = value;
      },
    },
    {
      data: 'dob',
      title: 'Age',
      renderer: (instance, td, row, col, prop, value) => {
        td.innerHTML = value;
      }
    },
    {
      data: 'dob',
      title: 'Day of Birth',
      renderer: (instance, td, row, col, prop, value) => {
        td.innerHTML = value;
      }
    },
    {
      data: 'dob',
      title: 'Month of Birth',
      renderer: (instance, td, row, col, prop, value) => {
        td.innerHTML = value;
      }
    },
    {
      data: 'dob',
      title: 'DOB in words',
      renderer: (instance, td, row, col, prop, value) => {
        td.innerHTML = value;
      }
    },
  ];
In our project, we will take advantage of the renderer property to format the provided date strings into four distinct forms:
- Age: We’ll calculate the age from the date of birth and display it in the cell.
- Day of Birth: We’ll extract and display the day of the week the person was born.
- Month of Birth: We’ll extract and display the month the person was born.
- DOB in Words: We’ll create a custom, human-readable format for the date of birth, such as ‘April 4, 1965’.
By using the renderer function, we can perform these transformations with ease and present the data in a visually appealing and informative way.
✅ Settings – Define an object for settings where we can list a Handsontable component’s configuration options. This object includes the data and column properties, among others. You can find all the options here.
For our project, we chose the below settings:
const settings = {
data: tableData,
columns,
stretchH: 'all',
autoWrapRow: true,
height: 400,
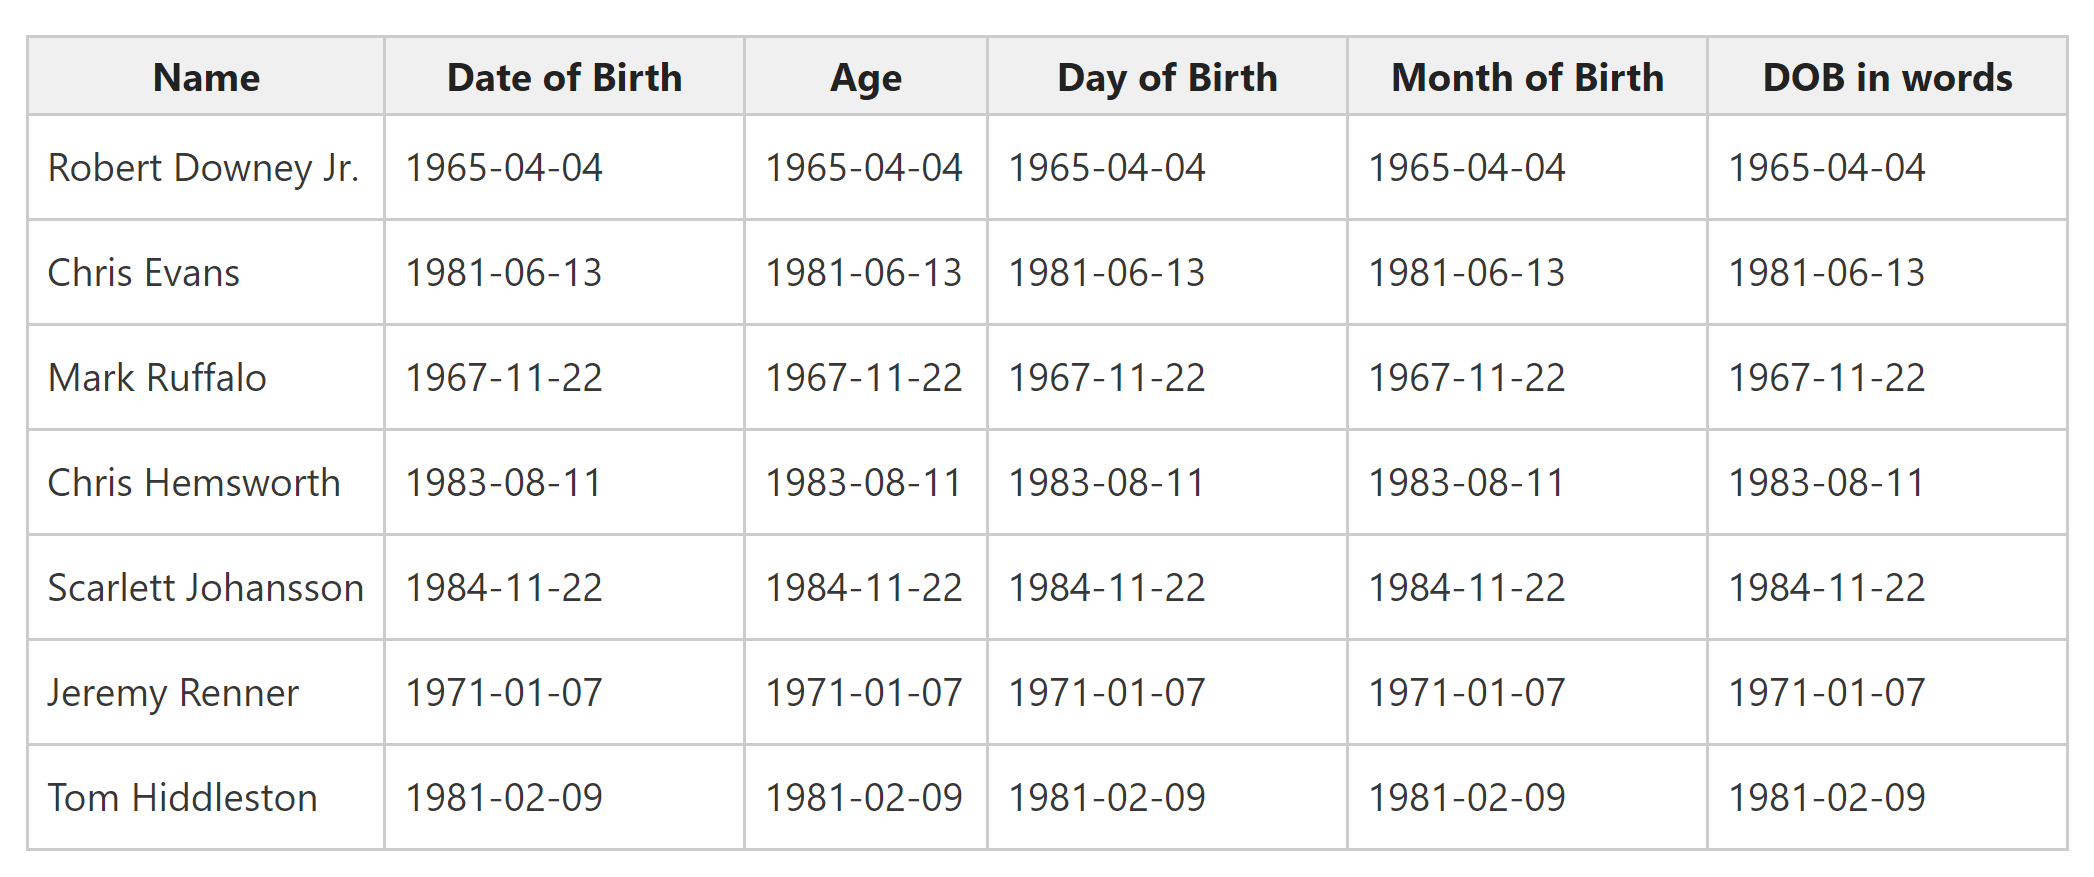
}We are ready to generate a data grid using the above data structures. Open App.js and write the below code:
import React from 'react';
import { HotTable } from '@handsontable/react';
import "handsontable/dist/handsontable.full.min.css";

const PAGE_HEADING = `Format date using day.js/date-fns in Handsontable data grid.`

function App() {

  const tableData = [
    { name: 'Robert Downey Jr.', dob: '1965-04-04' },
    { name: 'Chris Evans', dob: '1981-06-13' },
    { name: 'Mark Ruffalo', dob: '1967-11-22' },
    { name: 'Chris Hemsworth', dob: '1983-08-11' },
    { name: 'Scarlett Johansson', dob: '1984-11-22' },
    { name: 'Jeremy Renner', dob: '1971-01-07' },
    { name: 'Tom Hiddleston', dob: '1981-02-09' },
  ];

  const columns = [
    { data: 'name', title: 'Name' },
    {
      data: 'dob',
      title: 'Date of Birth',
      renderer: (instance, td, row, col, prop, value) => {
        td.innerHTML = value;
      },
    },
    {
      data: 'dob',
      title: 'Age',
      renderer: (instance, td, row, col, prop, value) => {
        td.innerHTML = value;
      },
    },
    {
      data: 'dob',
      title: 'Day of Birth',
      renderer: (instance, td, row, col, prop, value) => {
        td.innerHTML = value;
      },
    },
    {
      data: 'dob',
      title: 'Month of Birth',
      renderer: (instance, td, row, col, prop, value) => {
        td.innerHTML = value;
      },
    },
    {
      data: 'dob',
      title: 'DOB in words',
      renderer: (instance, td, row, col, prop, value) => {
        td.innerHTML = value;
      },
    },
  ];

  const settings = {
    data: tableData,
    columns,
    stretchH: 'all',
    autoWrapRow: true,
    height: 400,
  };

  return (
    <div className="App">
      <h2>{PAGE_HEADING}</h2>
      <HotTable
        settings={settings}
        licenseKey='non-commercial-and-evaluation'
      />
    </div>
  );
}

export default App;
If you run this code using npm run start, you will get the below output:
Creating formatting functions in date-fns and day.js
It’s time to harness the power of date formatting with both date-fns and day.js libraries. Let’s organize our code in a structured manner.
First, create the directory structure ./src/businesslogic/libs:
- src/
  - businesslogic/
    - libs/- src/
  - businesslogic/
    - libs/
Now, inside the ./src/businesslogic/libs directory, create two separate files, FormatWithDateFns.js and FormatWithDayJs.js. The directory structure should now look like this:
- src/
  - businesslogic/
    - libs/
      - FormatWithDateFns.js
      - FormatWithDayJs.js
These two files will hold our date formatting functions for date-fns and day.js. Let’s write the code:
FormatWithDateFns.js
import { parse, format, differenceInYears } from 'date-fns';

export default class FormatWithDateFns {
  static formatDateToAge(dateString) {
    const birthDate = parse(dateString, 'yyyy-MM-dd', new Date());
    const age = differenceInYears(new Date(), birthDate);
    return age;
  };

  // Format date as Day of Birth (e.g., Monday, Tuesday, etc.)
  static formatDateToDayOfBirth(dateString) {
    const birthDate = parse(dateString, 'yyyy-MM-dd', new Date());
    return format(birthDate, 'EEEE');
  };

  // Format date as Month of Birth (e.g., January, February, etc.)
  static formatDateToMonthOfBirth(dateString) {
    const birthDate = parse(dateString, 'yyyy-MM-dd', new Date());
    return format(birthDate, 'MMMM');
  };

  // Format date as Date of Birth in words (e.g., 25th December 1990)
  static formatDateToDOBInWords(dateString) {
    const birthDate = parse(dateString, 'yyyy-MM-dd', new Date());
    return format(birthDate, 'do MMMM yyyy');
  };
}
FormatWithDayJs.js
import dayjs from 'dayjs';
import customParseFormat from 'dayjs/plugin/advancedFormat';
dayjs.extend(customParseFormat);

export default class FormatWithDayJs {
  // Format date as Age
  static formatDateToAge(dateString) {
    const birthDate = dayjs(dateString, 'YYYY-MM-DD');
    const age = dayjs().diff(birthDate, 'year');
    return age;
  };

  // Format date as Day of Birth (e.g., Monday, Tuesday, etc.)
  static formatDateToDayOfBirth(dateString) {
    const birthDate = dayjs(dateString, 'YYYY-MM-DD');
    return birthDate.format('dddd');
  };

  // Format date as Month of Birth (e.g., January, February, etc.)
  static formatDateToMonthOfBirth(dateString) {
    const birthDate = dayjs(dateString, 'YYYY-MM-DD');
    return birthDate.format('MMMM');
  };

  // Format date as Date of Birth in words (e.g., 25th December 1990)
  static formatDateToDOBInWords(dateString) {
    const birthDate = dayjs(dateString, 'YYYY-MM-DD');
    return birthDate.format('Do MMMM YYYY');
  };
}
If you look at the code closely, you will find that the names of methods in both files are the same. We kept them the same so that by only changing the instances, we could call methods from both files.
Also, notice that we’re using class design with static methods. Now, we’ll use these classes to format dates in our data grid.
Using format functions in the Handsontable data grid
The design will include two buttons – `Format with date-fns` and `Format with Day.js`. Pressing the buttons will run the functions from the classes accordingly. This will be implemented in the App.js file.
First, import the classes:
import FormatWithDateFns from './businesslogic/libs/FormatWithDateFns';
import FormatWithDayJs from './businesslogic/libs/FormatWithDayJs';
Create constants for holding button titles:
const DATE_FNS_BUTTON_TITLE = `Format with date-fns`;
const DAY_JS_BUTTON_TITLE = `Format with Day.js`;
Define an object to map class instances with keys:
const REGISTRATION = {
  DATE_FNS: {
    key: 'date-fns',
    instance: FormatWithDateFns
  },
  DAYJS: {
    key: 'dayjs',
    instance: FormatWithDayJs
  }
}
The purpose of this object is to choose appropriate class instances while running format functions.
Next, we will declare a state variable to hold the key defined in the REGISTRATION object when a button is clicked:
const [formatClassKey, setFormatClassKey] = useState(null);
…
…
<button onClick={() => setFormatClassKey(REGISTRATION.DATE_FNS.key)}>{DATE_FNS_BUTTON_TITLE}</button> {' '}
<button onClick={() => setFormatClassKey(REGISTRATION.DAYJS.key)}>{DAY_JS_BUTTON_TITLE}</button>
So, when a button is clicked, the value of formatClassKey will be set to either date-fns or day.js.
At last, we will need to call different class methods in renderer:
const getRequiredInstance = (key) => {
    return Object.values(REGISTRATION)
      .find(obj => obj.key === key)
      ?.instance;
  }

const columns = [
    { data: 'name', title: 'Name' },
    {
      …
      renderer: (instance, td, row, col, prop, value) => {
        td.innerHTML = value;
      },
    },
    {
      …
      renderer: (instance, td, row, col, prop, value) => {
        td.innerHTML = formatClassKey ? getRequiredInstance(formatClassKey).formatDateToAge(value) : value;
      },
    },
    {
      …
      renderer: (instance, td, row, col, prop, value) => {
        td.innerHTML = formatClassKey ? getRequiredInstance(formatClassKey).formatDateToDayOfBirth(value) : value;
      },
    },
    {
      …
      renderer: (instance, td, row, col, prop, value) => {
        td.innerHTML = formatClassKey ? getRequiredInstance(formatClassKey).formatDateToMonthOfBirth(value) : value;
      },
    },
    {
      …
      renderer: (instance, td, row, col, prop, value) => {
        td.innerHTML = formatClassKey ? getRequiredInstance(formatClassKey).formatDateToDOBInWords(value) : value;
      },
    },
  ];
Here is the complete code for App.js:
import React, { useEffect, useState } from 'react';
import { HotTable } from '@handsontable/react';
import "handsontable/dist/handsontable.full.min.css";
import FormatWithDateFns from './businesslogic/libs/FormatWithDateFns';
import FormatWithDayJs from './businesslogic/libs/FormatWithDayJs';
const PAGE_HEADING = `Format date using day.js/date-fns in Handsontable data grid.`
const DATE_FNS_BUTTON_TITLE = `Format with date-fns`;
const DAY_JS_BUTTON_TITLE = `Format with Day.js`;
const PAGE_DESCRIPTION = `Formatting dates using `;
const REGISTRATION = {
DATE_FNS: {
key: 'date-fns',
instance: FormatWithDateFns
},
DAYJS: {
key: 'dayjs',
instance: FormatWithDayJs
}
}
function App() {
const [formatClassKey, setFormatClassKey] = useState(null);
const getRequiredInstance = (key) => {
return Object.values(REGISTRATION)
.find(obj => obj.key === key)
?.instance;
}
const tableData = [
{ name: 'Robert Downey Jr.', dob: '1965-04-04' },
{ name: 'Chris Evans', dob: '1981-06-13' },
{ name: 'Mark Ruffalo', dob: '1967-11-22' },
{ name: 'Chris Hemsworth', dob: '1983-08-11' },
{ name: 'Scarlett Johansson', dob: '1984-11-22' },
{ name: 'Jeremy Renner', dob: '1971-01-07' },
{ name: 'Tom Hiddleston', dob: '1981-02-09' },
];
const columns = [
{ data: 'name', title: 'Name' },
{
data: 'dob',
title: 'Date of Birth',
renderer: (instance, td, row, col, prop, value) => {
td.innerHTML = value;
},
},
{
data: 'dob',
title: 'Age',
renderer: (instance, td, row, col, prop, value) => {
td.innerHTML = formatClassKey ? getRequiredInstance(formatClassKey).formatDateToAge(value) : value;
},
},
{
data: 'dob',
title: 'Day of Birth',
renderer: (instance, td, row, col, prop, value) => {
td.innerHTML = formatClassKey ? getRequiredInstance(formatClassKey).formatDateToDayOfBirth(value) : value;
},
},
{
data: 'dob',
title: 'Month of Birth',
renderer: (instance, td, row, col, prop, value) => {
td.innerHTML = formatClassKey ? getRequiredInstance(formatClassKey).formatDateToMonthOfBirth(value) : value;
},
},
{
data: 'dob',
title: 'DOB in words',
renderer: (instance, td, row, col, prop, value) => {
td.innerHTML = formatClassKey ? getRequiredInstance(formatClassKey).formatDateToDOBInWords(value) : value;
},
},
];
const settings = {
data: tableData,
columns,
stretchH: 'all',
autoWrapRow: true,
height: 400,
};
return (
<div className="App">
<h2>{PAGE_HEADING}</h2>
{
formatClassKey && <p>{PAGE_DESCRIPTION} {formatClassKey}</p>
}
<HotTable
settings={settings}
licenseKey='non-commercial-and-evaluation'
/>
<button onClick={() => setFormatClassKey(REGISTRATION.DATE_FNS.key)}>{DATE_FNS_BUTTON_TITLE}</button> {' '}
<button onClick={() => setFormatClassKey(REGISTRATION.DAYJS.key)}>{DAY_JS_BUTTON_TITLE}</button>
</div>
);
}
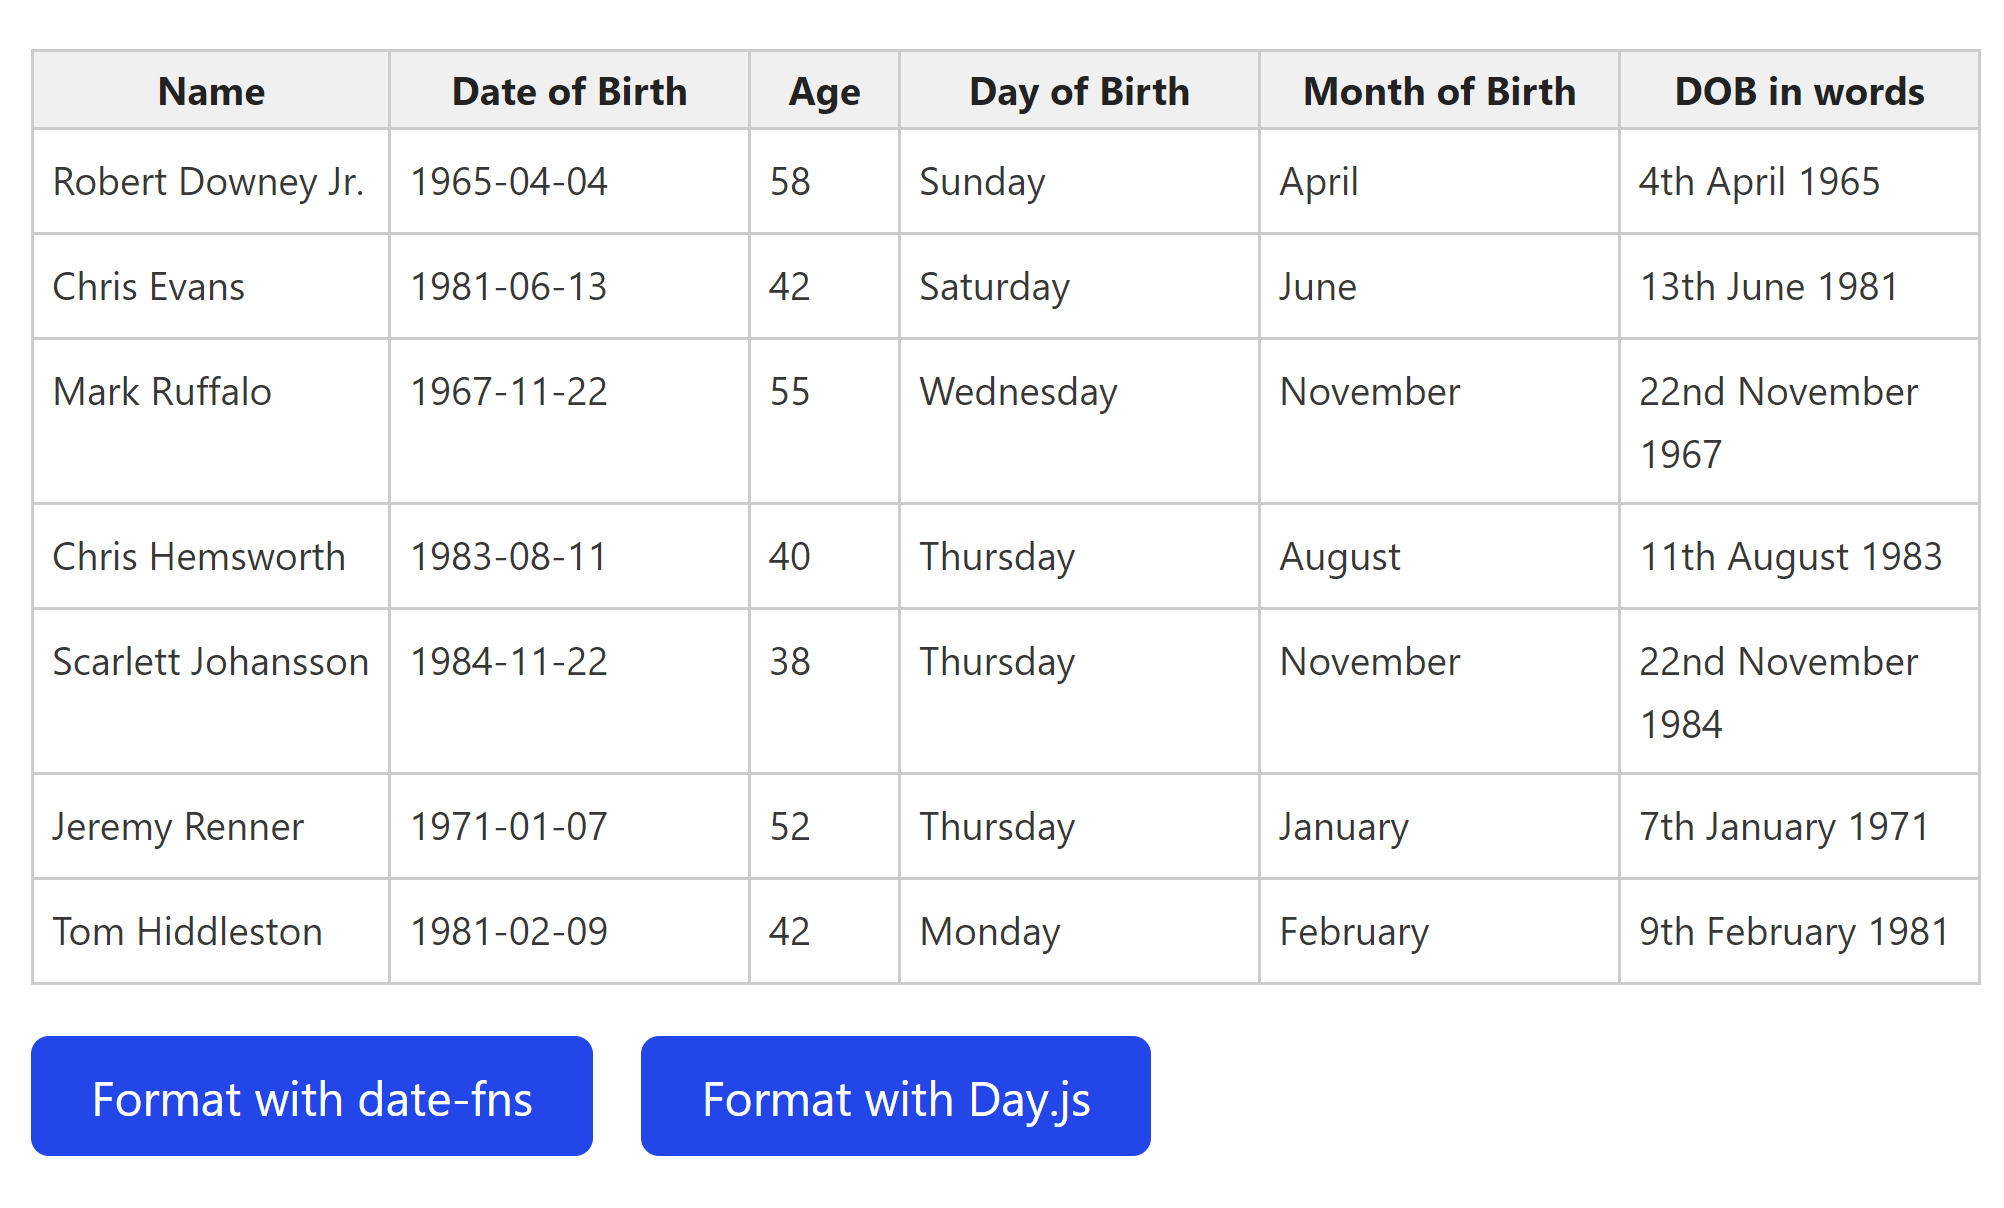
export default App;Here, we’ve also added a message indicating what library is being used for formatting. When you run this code, the output will look like this on pressing Format with date-fns button:
Conclusion
This guide has given you a fundamental understanding of cell renderers and their application in displaying customized data within a data grid. Through these cell renderers, date strings are substituted with properly formatted dates. Armed with this knowledge, you can now extend your capabilities to manage even more intricate transformations.
You might also be interested in our article demonstrating how to quickly build a public ledger to track your company’s expenses with React and Handsontable. Take a look!
Akash Mittal
A software developer and content creator with a passion for animals 🐈⬛