How to upload a file to a cell in Handsontable data grid
 Recipes / September 14, 2023

File upload is an essential process for storing blobs of data that encompass various formats such as images, videos, documents, presentations, spreadsheets, PDFs, and more. Without the capability to upload files, it would be challenging to display entities like images on a webpage.
Whilebase64strings can be used for this purpose, they come with downsides, such as increased bulkiness, lack of support for multipart batch uploading, and the consumption of memory space instead of storage.
In this article, you’ll learn how to integrate file upload functionality with the Handsontable data grid seamlessly. We’ll explain the process of managing various states, including uploading, completion, and failure.
Overview of custom cell rendering and file upload functionality
Custom cells in the Handsontable data grid significantly enhance the user experience by showcasing complex content. They allow the rendering of HTML components in place of simple text-based data. In order to incorporate file upload functionality, the utilization of a file picker becomes essential. This file picker can be seamlessly integrated into data grid cells through custom cell rendering.
Live Demo
Prerequisites & required libraries
For this project, we’ll use the following packages:
{
  "@handsontable/react": "13.0.0",
  "handsontable": "13.0.0",
  "react": "18.2.0",
  "react-dom": "18.2.0"
}
We’re also going to use TailwindCSS and DaisyUI for styling, but this is optional. You may use any CSS framework of your choice.
"devDependencies": {
  "autoprefixer": "10.4.2",
  "daisyui": "3.5.0",
  "postcss": "8.4.7",
  "tailwindcss": "3.3.3"
}
Step-by-step implementation of file upload in Handsontable data grid
Step 1: Create a React project using tools like Vite or Create React App. It’s worth noting that using Vite is encouraged by the React community. After setting up the project, proceed to install the required libraries.
Step 2: Tailwind CSS and DaisyUI require specific configuration settings. Create the below files at the root of the project directory.
tailwind.config.js
module.exports = {
  content: ['./src/**/*.{js,ts,jsx,tsx}'],
  plugins: [require('daisyui')],
  daisyui: {
    themes: ['light'],
    styled: true,
  },
};
postcss.config.js
module.exports = {
  plugins: [require('tailwindcss'), require('autoprefixer')],
};
Additionally, include these annotations at the beginning of the index.css file. Ensure that you import this CSS file within an entry script, such as index.js.
index.css
@tailwind base;
@tailwind components;
@tailwind utilities;
Step 3: Before we delve into creating the folder structure for our project, it’s essential to gain a clear understanding of how the final project layout will be organized.
These are the components:
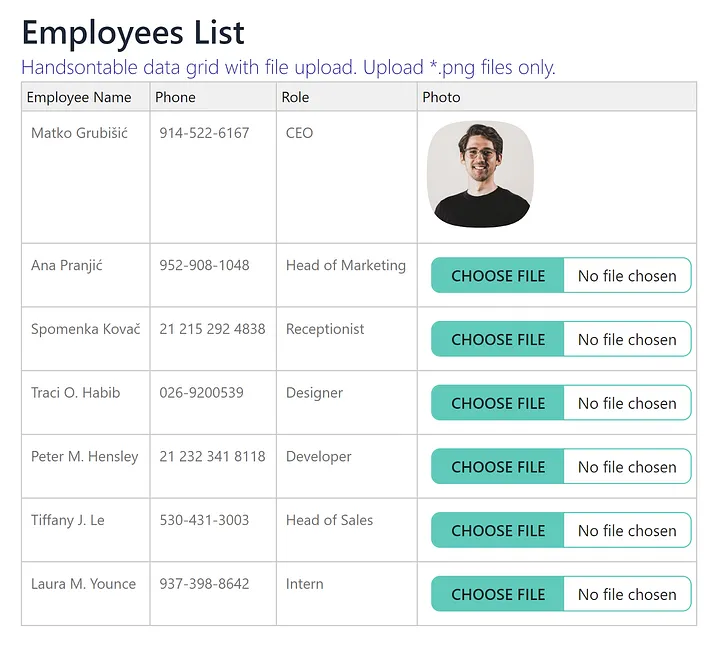
1. Main Heading: This represents the primary title of our application.
2. Subheading: A secondary title that provides additional context or information.
3. Data Grid: The central component of our project, comprising four columns.
4. File Upload Column: The fourth column, designed exclusively for uploading files. We’re limiting uploads to PNG images.
5. Column States: The last column has multiple states:
6. File Browser: When no image is set for a row, a file browser will be displayed.
7. Loader with Preview: The uploading state triggers a loader along with a preview image.
8. Image Display: Successful uploads result in the rendering of the uploaded image.
9. Fake Upload Component: To simulate the asynchronous nature of file uploads without a live server, we’ve created a fake upload component. This component mimics the upload process. However, we’ve also implemented actual server upload functionality for a comprehensive demo experience.
Step 4: Now let’s understand the folder structure:
project-directory/
src/
  - businesslogic/
       - constants.js
       - FakeUpload.js
       - ImageColumnRenderer.js
       - TableData.js
           - App.js
           - App.css
constants.js — This file houses constants utilized for strings such as headings, subheadings, and file states, among others.
FakeUpload.js — It contains the logic responsible for both file upload functionality and the generation of image previews.
ImageColumnRenderer.js — In this script, you’ll find functions designed to generate HTML representations corresponding to various states within the file upload process. For instance, it creates a file picker for the NOT_AVAILABLE state, a progress bar for the UPLOADING state, and an image display for the UPLOADED state.
TableData.js — Data to display in the table like Employee name, Phone, Role etc.
App.js — Displaying Handsontable data grid.
Step 5: Let’s write the code:
constants.js
export const PAGE_HEADING = 'Employees List';

export const PAGE_DESCRIPTION =
  'Handsontable data grid with file upload. Upload *.png files only.';

export const EMPLOYEES_ROLE = {
  DEVELOPER: 'Developer',
  DESIGNER: 'Designer',
  CEO: 'CEO',
  MARKETING_HEAD: 'Head of Marketing',
  SALES_HEAD: 'Head of Sales',
  RECEPTIONIST: 'Receptionist',
  INTERN: 'Intern',
};

export const PHOTO_STATES = {
  NOT_AVAILABLE: {
    KEY: 'not_available',
    DATA: {},
  },
  UPLOADING: {
    KEY: 'uploading',
    DATA: {
      PROGRESS: 'progress',
      PREVIEW_URL: 'preview_url',
    },
  },
  UPLOADED: {
    KEY: 'uploaded',
    DATA: {
      PHOTO_URL: 'photo_url',
    },
  },
  FAILED: {
    KEY: 'failed',
    DATA: {
      MESSAGE: 'message',
    },
  },
};

export const PHOTOS_OBJ_INTERFACE = {
  ID: 'id',
  STATE: 'state',
  DATA: 'data',
};
FakeUpload.js
export default class FakeUpload {
  constructor(serverUrl = null) {
    this.serverUrl = serverUrl;
  }

  async uploadImage(event, setProgress = (progress) => {}) {
    const fileInput = event.target;

    if (fileInput.files && fileInput.files[0]) {
      if (this.serverUrl?.length > 0) {
        return new Promise((resolve, reject) => {
          const formData = new FormData();
          formData.append('image', fileInput.files[0]);

          fetch(this.serverUrl, {
            method: 'POST',
            body: formData,
            onUploadProgress: (event) => {
              if (event.lengthComputable) {
                const progress = (event.loaded / event.total) * 100;
                setProgress(progress);
              }
            },
          })
            .then((response) => {
              resolve(response.data.imageUrl);
            })
            .catch((error) => {
              reject(new Error('Error occurred during image upload'));
            });
        });
      } else {
        return new Promise((resolve) => {
          const totalSteps = 50; // Total steps for the simulation
          let currentStep = 0;

          const intervalId = setInterval(() => {
            currentStep++;

            // Calculate progress percentage
            const progress = (currentStep / totalSteps) * 100;

            setProgress(Math.ceil(progress));

            if (currentStep >= totalSteps) {
              clearInterval(intervalId);
              const reader = new FileReader();

              reader.onload = function (event) {
                resolve(event.target.result);
              };

              reader.readAsDataURL(fileInput.files[0]);
            }
          }, 60); // Update progress every 60 milliseconds (adjust as needed)
        });
      }
    }
  }

  generatePreview(event, setPreviewData = (previewData) => {}) {
    const fileInput = event.target;

    if (fileInput.files && fileInput.files[0]) {
      const reader = new FileReader();

      reader.onload = function (event) {
        setPreviewData(event.target.result);
      };

      reader.readAsDataURL(fileInput.files[0]);
    } else {
      setPreviewData(''); // Empty the preview if no image selected
    }
  }
}
ImageColumnRenderer.js
import { PHOTOS_OBJ_INTERFACE, PHOTO_STATES } from './constants';

export default class ImageColumnRenderer {
  static renderUploadedState(photoState, value = '') {
    return `
      <div class="avatar">
        <div class="w-24 mask mask-squircle">
          <img src="${
            photoState?.[PHOTOS_OBJ_INTERFACE.DATA]?.[
              PHOTO_STATES.UPLOADED.DATA.PHOTO_URL
            ] ?? value
          }" />
        </div>
      </div>
    `;
  }

  static renderProgressState(photoState) {
    const progress =
      photoState?.[PHOTOS_OBJ_INTERFACE.DATA]?.[
        PHOTO_STATES.UPLOADING.DATA.PROGRESS
      ] ?? 0;

    return `
      <div class="card w-24 bg-base-100 image-full">
        <figure><img src="${
          photoState?.[PHOTOS_OBJ_INTERFACE.DATA]?.[
            PHOTO_STATES.UPLOADING.DATA.PREVIEW_URL
          ]
        }" /></figure>
        <div class="card-body">
          <div class="radial-progress" style="--value:${progress};--size: 2rem;">${progress}%</div>
        </div>
      </div>
    `;
  }

  static _fileUploadInputField(id) {
    return `
      <input data-row-id="${id}" type="file" accept="image/png" class="file-input file-input-sm file-input-accent" style="height: auto" />
    `;
  }

  static renderNotAvailableState(photoState) {
    return `
      <div class="form-control w-full max-w-xs p-1">
        ${ImageColumnRenderer._fileUploadInputField(
          photoState[PHOTOS_OBJ_INTERFACE.ID]
        )}
      </div>
    `;
  }

  static renderFailedState(photoState) {
    return `
      <div class="form-control w-full max-w-xs p-1">
        ${ImageColumnRenderer._fileUploadInputField(
          photoState[PHOTOS_OBJ_INTERFACE.ID]
        )}
        ${
          photoState?.[PHOTOS_OBJ_INTERFACE.STATE] === PHOTO_STATES.FAILED.KEY
            ? `
            <label class="label">
              <span class="label-text label-error">${
                photoState?.[PHOTOS_OBJ_INTERFACE.DATA]?.[
                  PHOTO_STATES.FAILED.DATA.MESSAGE
                ] ?? 'Error in uploading file'
              }</span>
            </label>
          `
            : ''
        }
      </div>
    `;
  }
}
TableData.js
import { EMPLOYEES_ROLE } from './constants';

export default class TableData {
  static getTableData() {
    return [
      {
        id: 'id1',
        name: 'Matko Grubišić',
        phone: '914-522-6167',
        role: EMPLOYEES_ROLE.CEO,
        photo: 'https://images.unsplash.com/photo-1633332755192-727a05c4013d?ixlib=rb-4.0.3&ixid=M3wxMjA3fDB8MHxwaG90by1wYWdlfHx8fGVufDB8fHx8fA%3D%3D&auto=format&fit=crop&w=3880&q=80',
      },
      {
        id: 'id2',
        name: 'Ana Pranjić',
        phone: '952-908-1048',
        role: EMPLOYEES_ROLE.MARKETING_HEAD,
        photo: '',
      },
      {
        id: 'id3',
        name: 'Spomenka Kovač',
        phone: '21 215 292 4838',
        role: EMPLOYEES_ROLE.RECEPTIONIST,
        photo: '',
      },
      {
        id: 'id4',
        name: 'Traci O. Habib',
        phone: '026-9200539',
        role: EMPLOYEES_ROLE.DESIGNER,
        photo: '',
      },
      {
        id: 'id5',
        name: 'Peter M. Hensley',
        phone: '21 232 341 8118',
        role: EMPLOYEES_ROLE.DEVELOPER,
        photo: '',
      },
      {
        id: 'id6',
        name: 'Tiffany J. Le',
        phone: '530-431-3003',
        role: EMPLOYEES_ROLE.SALES_HEAD,
        photo: '',
      },
      {
        id: 'id7',
        name: 'Laura M. Younce',
        phone: '937-398-8642',
        role: EMPLOYEES_ROLE.INTERN,
        photo: '',
      },
    ];
  }
}
App.css
.handsontable td,
.handsontable th {
  white-space: unset;
  padding: 8px;
}
.handsontable th {
  text-align: left;
}
App.js
import React, { useEffect, useState } from 'react';
import { HotTable } from '@handsontable/react';
import 'handsontable/dist/handsontable.full.min.css';
import { registerAllModules } from 'handsontable/registry';
import './App.css';
import {
  PAGE_DESCRIPTION,
  PAGE_HEADING,
  PHOTOS_OBJ_INTERFACE,
  PHOTO_STATES,
} from './businesslogic/constants';
import TableData from './businesslogic/TableData';
import ImageColumnRenderer from './businesslogic/ImageColumnRenderer';
import FakeUpload from './businesslogic/FakeUpload';

// register Handsontable's modules
registerAllModules();

const UPLOAD_URL = '';

function App() {
  const hotRef = React.useRef(null);
  const [photos, setPhotos] = useState({});

  useEffect(() => {
    setTimeout(() => {
      hotRef.current.hotInstance.render();
    }, 100);
  }, []);

  useEffect(() => {
    return () => {
      const fileInputs = document.querySelectorAll("input[type='file']");
      fileInputs.forEach((fileInput) => {
        fileInput.removeEventListener('change', onFileUpload);
      });
    };
  }, []);

  const addFileUploadClickListener = (td) => {
    const fileInput = td.querySelector("input[type='file']");
    if (fileInput) {
      fileInput.addEventListener('change', onFileUpload);
    }
  };

  const removeFileUploadClickListener = (td) => {
    const fileInput = td.querySelector("input[type='file']");
    if (fileInput) {
      fileInput.removeEventListener('change', onFileUpload);
    }
  };

  const onFileUpload = (event) => {
    const id = event.target.dataset.rowId;
    const fakeUploadInstance = new FakeUpload(UPLOAD_URL);

    fakeUploadInstance.generatePreview(event, (previewData) => {
      setPhotos((prevPhotos) => ({
        ...prevPhotos,
        [id]: {
          ...prevPhotos[id],
          [PHOTOS_OBJ_INTERFACE.STATE]: PHOTO_STATES.UPLOADING.KEY,
          [PHOTOS_OBJ_INTERFACE.DATA]: {
            [PHOTO_STATES.UPLOADING.DATA.PROGRESS]: 0,
            [PHOTO_STATES.UPLOADING.DATA.PREVIEW_URL]: previewData,
          },
        },
      }));
    });

    fakeUploadInstance
      .uploadImage(event, (progress) => {
        setPhotos((prevPhotos) => ({
          ...prevPhotos,
          [id]: {
            ...prevPhotos[id],
            [PHOTOS_OBJ_INTERFACE.DATA]: {
              ...prevPhotos[id][PHOTOS_OBJ_INTERFACE.DATA],
              [PHOTO_STATES.UPLOADING.DATA.PROGRESS]: progress,
            },
          },
        }));
      })
      .then((imageUrl) => {
        setPhotos((prevPhotos) => ({
          ...prevPhotos,
          [id]: {
            ...prevPhotos[id],
            [PHOTOS_OBJ_INTERFACE.STATE]: PHOTO_STATES.UPLOADED.KEY,
            [PHOTOS_OBJ_INTERFACE.DATA]: {
              [PHOTO_STATES.UPLOADED.DATA.PHOTO_URL]: imageUrl,
            },
          },
        }));
      })
      .catch((e) => {
        setPhotos((prevPhotos) => ({
          ...prevPhotos,
          [id]: {
            ...prevPhotos[id],
            [PHOTOS_OBJ_INTERFACE.STATE]: PHOTO_STATES.FAILED.KEY,
            [PHOTOS_OBJ_INTERFACE.DATA]: {
              [PHOTO_STATES.FAILED.DATA.MESSAGE]: e.message,
            },
          },
        }));
      });
  };

  const tableData = TableData.getTableData();

  const columns = [
    { data: 'name', title: 'Employee Name' },
    { data: 'phone', title: 'Phone' },
    { data: 'role', title: 'Role' },
    {
      data: 'photo',
      title: 'Photo',
      width: '250px',
      renderer: (instance, td, row, col, prop, value) => {
        const photoState = photos[tableData[row].id];

        removeFileUploadClickListener(td);

        switch (photoState?.[PHOTOS_OBJ_INTERFACE.STATE]) {
          case PHOTO_STATES.UPLOADED.KEY:
            td.innerHTML = ImageColumnRenderer.renderUploadedState(
              photoState,
              value
            );
            break;
          case PHOTO_STATES.UPLOADING.KEY:
            td.innerHTML = ImageColumnRenderer.renderProgressState(photoState);
            break;
          case PHOTO_STATES.FAILED.KEY:
            td.innerHTML = ImageColumnRenderer.renderFailedState(photoState);
            break;
          case PHOTO_STATES.NOT_AVAILABLE.KEY:
            td.innerHTML =
              ImageColumnRenderer.renderNotAvailableState(photoState);
            break;
          default:
            if (value?.length > 0) {
              td.innerHTML = ImageColumnRenderer.renderUploadedState(
                photoState,
                value
              );
            } else {
              td.innerHTML = '';
              setPhotos((prevPhotoState) => ({
                ...prevPhotoState,
                [tableData[row].id]: {
                  [PHOTOS_OBJ_INTERFACE.ID]: tableData[row].id,
                  [PHOTOS_OBJ_INTERFACE.STATE]: PHOTO_STATES.NOT_AVAILABLE.KEY,
                  [PHOTOS_OBJ_INTERFACE.DATA]: PHOTO_STATES.NOT_AVAILABLE.DATA,
                },
              }));
            }
            break;
        }

        addFileUploadClickListener(td);
      },
    },
  ];

  const settings = {
    data: tableData,
    columns,
    autoWrapRow: true,
    readOnly: true,
  };

  return (
    <div className={'container p-6'}>
      <h2 className={'text-3xl font-semibold'}>{PAGE_HEADING}</h2>
      <p className={'text-lg font-light text-indigo-800'}>{PAGE_DESCRIPTION}</p>

      <div>
        <HotTable
          ref={hotRef}
          settings={settings}
          licenseKey="non-commercial-and-evaluation"
        />
      </div>
    </div>
  );
}

export default App;
Conclusion
We’ve come to the end of this hands-on guide. Along the way, you’ve learned how custom cell rendering is key to showing complex content in a Handsontable data grid. We implemented this knowledge to create a convenient way for directly uploading images into table cells. This finds practical use in scenarios such as maintaining employee records complete with their photographs, or archiving invoices for tax and auditing purposes.
You might also be interested in our article demonstrating how to integrate React Hook Form with the React data grid. Take a look!
Akash Mittal
A software developer and content creator with a passion for animals 🐈⬛