Understanding data binding in React
 Tools / April 26, 2023
React is a fascinating library of JavaScript that simplifies creating frontend and user interface. One of the important aspects is how it binds data with the UI components. Data binding in React can be done through declared variables, props and state. It gives us the flexibility to synchronize both the data as well as UI.
In this article, we will focus on data binding techniques and the differences between them. We will explain the concepts using various examples and use cases.
Types of data binding
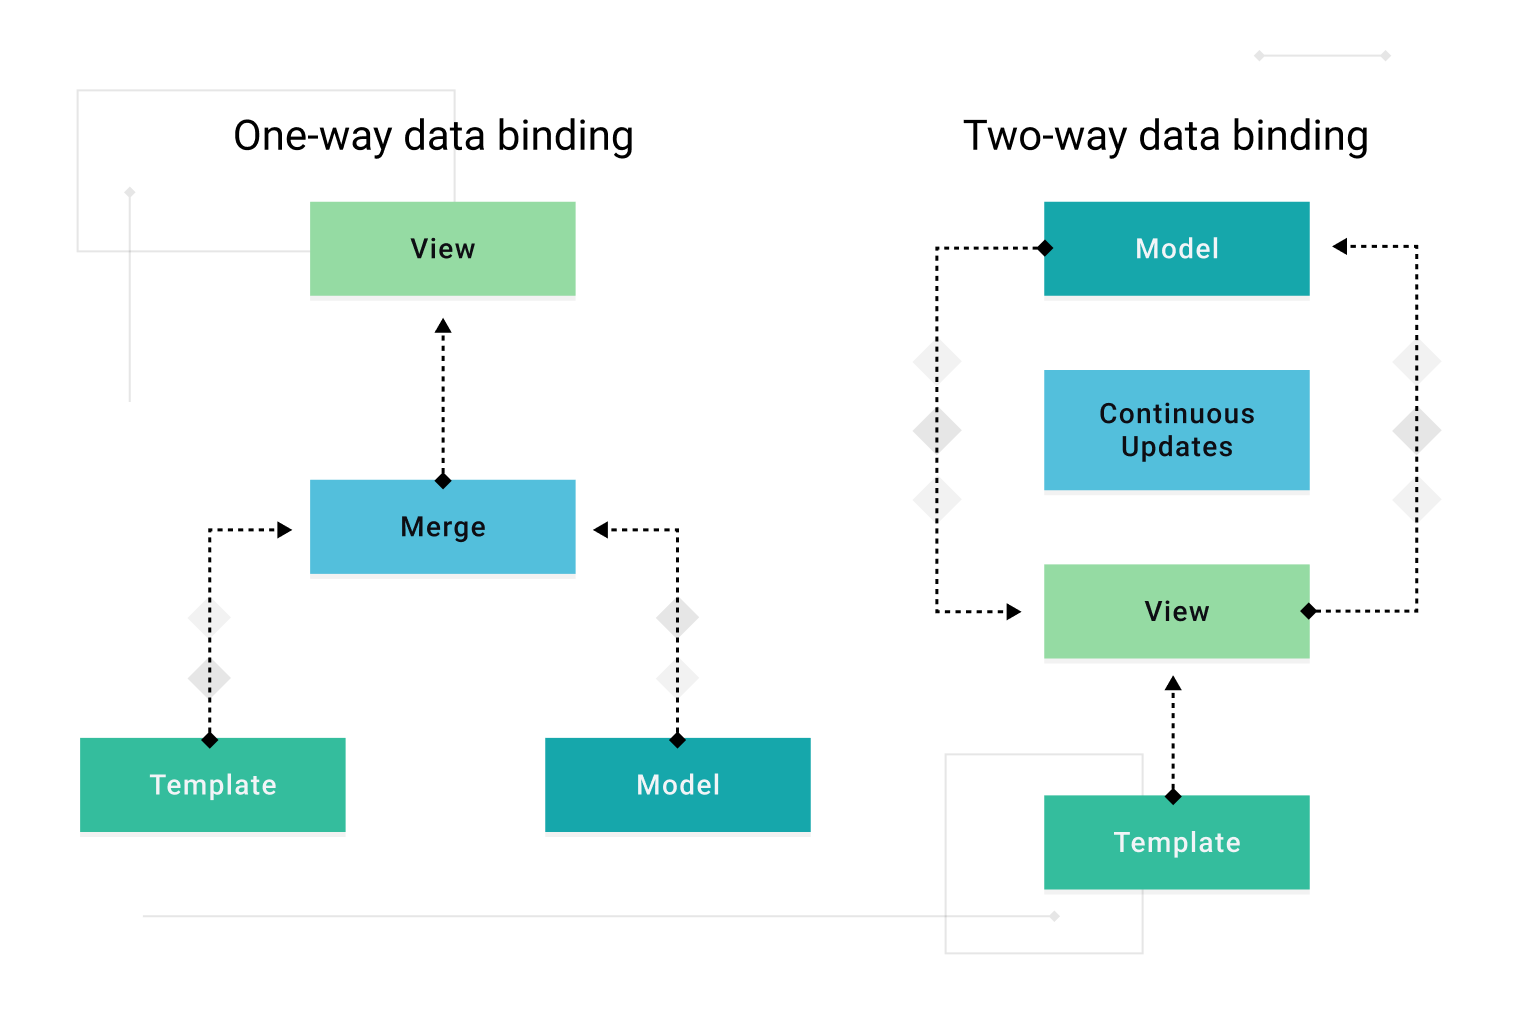
There are primarily two types of data binding techniques in React: one-way data binding and two-way data binding. Although there are a few more like context data binding, we will keep our focus on the above two.
One-way data binding
One-way means that the binding happens in one direction. In this case, changes in the data automatically update the UI, but changes in the UI do not automatically update the data. That’s why it is referred to as one-way data binding.
React achieves one-way data binding by using state and props.
Props
Props (short for properties) are the mechanism by which data is passed from a parent component to its children. They are read-only, meaning that child components cannot modify the data received from their parent components.
Now since the data is read-only, the child component can’t update it. This is one-way data binding.
function Welcome(props) {
	return <h1>Hello, {props.name}! </h1>;
}
function App() {
	return <Welcome name="John" />;
}
State
Components in React can have dynamic behavior by representing their internal data using state, which can be managed in both class and function components.
✅ Initializing state
In class components, state is initialized in the constructor.
class Counter extends React.Component {
  constructor(props) {
    super(props);
    this.state = {
      count: 0,
    };
  }
}
In function components, the useState hook is used to manage state.
import React, { useState } from 'react';

function Counter() {
  const [count, setCount] = useState(0);
}
✅ Updating state with setState
In class components, state is updated using the setState method.
class Counter extends React.Component {
  // ...
  increment() {
    this.setState({ count: this.state.count + 1 });
  }
}
✅ Using state in class components
class Counter extends React.Component {
  // ...
  render() {
    return (
      <div>
        <h1>{this.state.count}</h1>
        <button onClick={() => this.increment()}>Increment</button>
      </div>
    );
  }
}
✅ Using state in function components with useState hook
import React, { useState } from 'react';

function Counter() {
  const [count, setCount] = useState(0);

  function increment() {
    setCount(count + 1);
  }

  return (
    <div>
      <h1>{count}</h1>
      <button onClick={increment}>Increment</button>
    </div>
  );
}
In the above examples, we have defined state in class as well as functional components. The state data is bound to the UI. At the click of a button, the count will increase which will get reflected in the UI.
Two-way data binding
Two-way data binding allows bidirectional data flow, meaning that changes in the UI automatically update the component’s state, and changes in the state automatically update the UI. In React, two-way data binding is achieved using controlled components.
Controlled components
Controlled components are form elements whose values are controlled by the state. They maintain a consistent, bidirectional data flow between the UI components and the data models.
✅ Understanding controlled components
class Form extends React.Component {
  constructor(props) {
    super(props);
    this.state = { value: '' };
  }

  handleChange(event) {
    this.setState({ value: event.target.value });
  }

  handleSubmit(event) {
    // Process form data
  }

  render() {
    return (
      <form onSubmit={this.handleSubmit.bind(this)}>
        <input
          type="text"
          value={this.state.value}
          onChange={this.handleChange.bind(this)}
        />
        <button type="submit">Submit</button>
      </form>
    );
  }
}
✅ Implementing controlled components in function components
import React, { useState } from 'react';

function Form() {
  const [value, setValue] = useState('');

  function handleChange(event) {
    setValue(event.target.value);
  }

  function handleSubmit(event) {
    // Process form data
  }

  return (
    <form onSubmit={handleSubmit}>
      <input type="text" value={value} onChange={handleChange} />
      <button type="submit">Submit</button>
    </form>
  );
}
In the above code, two-way data binding is achieved by binding the value attribute of the input element to the value state variable using the useState hook, and binding the onChangeevent of the input element to the handleChange function.
When the user types something in the input field, the onChange event of the input element is triggered, which calls the handleChange function. The handleChange function updates the value state variable with the current value of the input field using the setValue function provided by the useState hook.
This update to the value state variable triggers a re-render of the Form component, causing the value attribute of the input element to be updated with the new value of the value state variable. This is how the input field stays in sync with the value state variable, creating one-way data binding.
On the other hand, when the value state variable is updated by some other means, such as by submitting the form, the input element is automatically updated with the new value because it is bound to the value state variable. This is how the value state variable stays in sync with the input field, creating the second half of two-way data binding.
Overall, this two-way data binding allows for seamless interaction between the user and the form, where changes made in the input field are immediately reflected in the state of the component, and vice versa.
Comparing one-way and two-way data binding
| Unidirectional data flow | Bidirectional data flow |
| UI updates automatically when data changes, but not vice versa | UI and data are automatically in sync |
| Uses state and props | Uses controlled components |
| Easier to reason about and debug | Provides more control over form elements and validation |
Use cases and examples
✅ Displaying a list of items
To display a list of items on a web page, developers commonly rely on li tags, tables, and data grids, among which Handsontable offers a powerful, and feature-rich data grid solution for React projects.
Explore Handsontable demo for React
Using one-way data binding, you can display a list of items by passing the data through props and rendering it in a child component.
function ItemList({ items }) {
  return (
    <ul>
      {items.map((item, index) => (
        <li key={index}>{item}</li>
      ))}
    </ul>
  );
}

function App() {
  const items = ['Item 1', 'Item 2', 'Item 3'];
  return <ItemList items={items} />;
}
✅ Filtering a list of items
In this example, we demonstrate two-way data binding by implementing a search filter that updates the displayed list of items based on user input.
import React, { useState } from 'react';

function SearchFilter({ items }) {
  const [filter, setFilter] = useState('');

  const filteredItems = items.filter((item) =>
    item.toLowerCase().includes(filter.toLowerCase())
  );

  function handleFilterChange(event) {
    setFilter(event.target.value);
  }

  return (
    <div>
      <input
        type="text"
        value={filter}
        onChange={handleFilterChange}
        placeholder="Search"
      />
      <ul>
        {filteredItems.map((item, index) => (
          <li key={index}>{item}</li>
        ))}
      </ul>
    </div>
  );
}

function App() {
  const items = ['Apple', 'Banana', 'Orange', 'Grape'];
  return <SearchFilter items={items} />;
}
✅ Creating a form with validation
Combining one-way and two-way data binding techniques, you can create a form with validation that displays error messages based on the current state.
import React, { useState } from 'react';

function FormWithValidation() {
  const [email, setEmail] = useState('');
  const [password, setPassword] = useState('');
  const [errors, setErrors] = useState({});

  function validateForm() {
    const newErrors = {};

    if (!email) {
      newErrors.email = 'Email is required.';
    }

    if (!password) {
      newErrors.password = 'Password is required.';
    }

    setErrors(newErrors);
    return Object.keys(newErrors).length === 0;
  }

  function handleSubmit(event) {
    event.preventDefault();

    if (validateForm()) {
      // Process form data
    }
  }

  return (
    <form onSubmit={handleSubmit}>
      <div>
        <label>Email:</label>
        <input
          type="email"
          value={email}
          onChange={(e) => setEmail(e.target.value)}
        />
        {errors.email && <div className="error">{errors.email}</div>}
      </div>
      <div>
        <label>Password:</label>
        <input
          type="password"
          value={password}
          onChange={(e) => setPassword(e.target.value)}
        />
        {errors.password && <div className="error">{errors.password}</div>}
      </div>
      <button type="submit">Submit</button>
    </form>
  );
}

function App() {
  return <FormWithValidation />;
}
In this example, we use two-way data binding to control form input values and one-way data binding to display validation messages based on the current state.
Advanced data binding techniques
Let’s explore how we can utilize some advanced techniques in React to create more complex and flexible applications beyond one-way and two-way data binding.
✅ Lifting state up
Lifting state up is a technique where the state is moved to a common ancestor component, enabling sibling components to share and synchronize data. This approach allows for better communication between components and promotes a unidirectional data flow.
Example: Synchronizing two input fields
function InputField({ value, onChange }) {
  return <input type="text" value={value} onChange={onChange} />;
}

function App() {
  const [value, setValue] = useState('');

  function handleChange(event) {
    setValue(event.target.value);
  }

  return (
    <div>
      <InputField value={value} onChange={handleChange} />
      <InputField value={value} onChange={handleChange} />
    </div>
  );
}
✅ Compound components
Compound components are a technique to create more flexible and composable components by grouping multiple components together and managing their shared state.
Example: Customizable dropdown component
function Dropdown({ children }) {
  const [isOpen, setIsOpen] = useState(false);

  function toggleDropdown() {
    setIsOpen(!isOpen);
  }

  return React.Children.map(children, (child) => {
    return React.cloneElement(child, { isOpen, toggleDropdown });
  });
}

function DropdownButton({ toggleDropdown }) {
  return <button onClick={toggleDropdown}>Toggle Dropdown</button>;
}

function DropdownContent({ isOpen, children }) {
  return isOpen ? <div>{children}</div> : null;
}

function App() {
  return (
    <Dropdown>
      <DropdownButton />
      <DropdownContent>
        <p>Content 1</p>
        <p>Content 2</p>
      </DropdownContent>
    </Dropdown>
  );
}
By understanding and incorporating these advanced data binding techniques into your React applications, you can create more complex, flexible, and scalable solutions.
Conclusion
Mastering data binding in React is essential for building efficient, maintainable, and scalable web applications. Understanding the different techniques, such as one-way data binding with state and props and two-way data binding with controlled components, will help you easily create powerful applications.
To further your knowledge, consider exploring resources like the official React documentation, online tutorials, and community-driven content. Continuously experiment with advanced techniques, libraries, and tools to expand your skill set and keep up with the ever-evolving world of web development.
Akash Mittal
A software developer and content creator with a passion for animals 🐈⬛