Customize Handsontable Context Menu
 Recipes / November 8, 2016
For up-to-date Handsontable documentation, see handsontable.com/docs.
We distinguish two most common ways to manipulate the spreadsheet and its contents. One is by using external controls like buttons utilizing the API. Whenever possible though it is much better to use some of the built-in plugins, such as the context menu. It is surprisingly easy to use and highly customizable. In this article I will tell you a bit about it and show you how to adapt it to your needs.
What is a context menu?
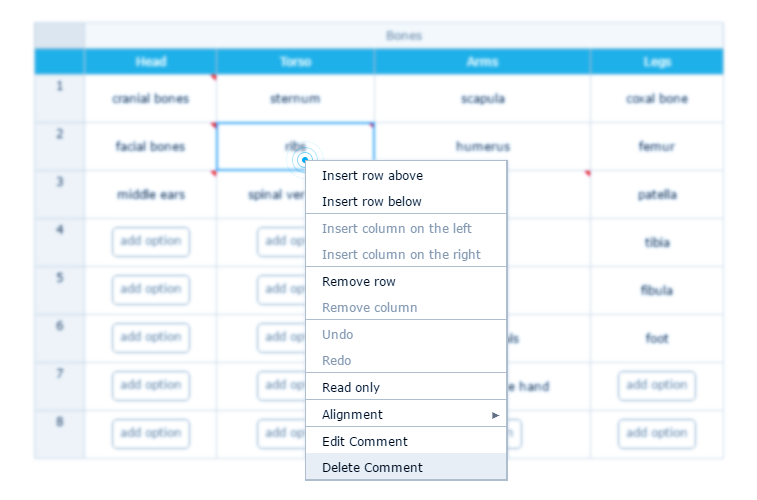
A context menu is an additional menu which is hidden by default and can be shown with the right-click of the mouse anywhere in the body of a spreadsheet or a header of row and column. To turn on a context menu with the default items, just pass the following configuration:
contextMenu: true
By default, it includes the following items separated with the thin horizontal line called a separator. Each of the options has a corresponding key (in the brackets) which will be described further in this article.
- Insert row above (
row_above) - Insert row below (
row_below) - Insert column on the left (
col_left) - Insert column on the right (
col_right) - Remove row (
remove_row) - Remove column (
remove_col) - Undo (
undo) - Redo (
redo) - Read only (
make_read_only) - Alignment (
alignment)- Left, Center, Justify
- Top, Middle, Bottom
And there is one more pre-defined item, which is not available out of the box, but highly useful in some cases:
- Custom borders (
customBorders)
It allows to change a cell’s border straight from the context menu.
Adding pre-defined items to a context menu
Let’s assume that you need to remove some options from the context menu and leave the rest. To do that, pass the keys assigned to the required items. For example, if you want to display a context menu including only Undo, Redo and Alignment, pass the following configuration:
contextMenu: ['undo', 'redo', 'alignment']
Here is a working demo for this example:
Adding custom items to a context menu
If you build a complex application, you might find it useful to put some options in the context menu instead of making them available at first sight. Luckily, there are almost no limitations to what your custom options can or cannot do. By using a context menu configuration, you can just pass the labels and then bind them with any given logic. Take a look at the demos that I have prepared:
- “Make it bold” – makes the text inside a cell bold.
- “Export to CSV” – exports your table to a CSV file . This feature is available in the PRO version of Handsontable.
Copy and paste in a context menu
Instead of using a shortcut key to copy-paste data, you can make those options available in the context menu. Some users may be accustomed to such a functionality. To turn it on for your spreadsheet, you need to use the ZeroClipboard flash library. It is not an elegant solution these days, but the only one that works seamlessly across all browsers.
First, add a script to your page:
<script src="/bower_components/zeroclipboard/dist/ZeroClipboard.min.js"></script>
Next point is to refer to the SWF file included in the ZeroClipboard library. If you used Bower to install it, then your address may look like this:
    contextMenuCopyPaste: {
        swfPath: '/bower_components/zeroclipboard/dist/ZeroClipboard.swf'
    }
Disabling certain items
Handsontable automatically disables options that can’t be applied in a certain situation. For instance, if you open a context menu for a row’s header then you won’t be able to insert or remove a column. You will experience a similar scenario with the column’s header.
Furthermore, certain basic actions have their own parameters. I’m particularly referring to inserting and removing rows and columns. They are set to “true” by default and to remove them from a context menu you can pass the following options:
allowInsertRow: falseallowInsertColumn: falseallowRemoveRow: falseallowRemoveColumn: false
See it live yourself:
Pre-defined items in the PRO version
You should know that a context menu extends the powers of two plugins available in Handsontable PRO, i.e. “Hiding columns” and “Hiding rows” . To hide or show certain parts of the grid use the following keys:
hidden_columns_showhidden_columns_hidehidden_rows_showhidden_rows_hide
Interesting facts
Consider this rather off-topic, but still worth mentioning. Did you know that the context menu is just another instance of Handsontable itself? Surprised? To make it more confusing, look at the Filter plugin which is a part of Handsontable Pro. It allows you to filter data and is available for the user from the dropdown menu in the column’s header. This is how we built the filter plugin:
- first we took an instance of Handsontable,
- … then created a context menu out of it,
- … then created a dropdown menu upon it,
- … then we put another Handsontable instance inside it to create a list of values that are able to be filtered.
See it live here:
Yeah, we freakin’ love Handsontable and re-use it whenever possible.
Limitations
The most known limitation is the inability to create multi-level submenus and no-go for touchscreens. Don’t worry, we will catch up soon.
Conclusion
Enjoy the context menu but don’t overload it with too many different options. It should be treated as any other UI component in your application, always created with the user’s needs in mind.
Aleksandra Budnik
An expert in research and analytics. She also used to run her own e-commerce business.